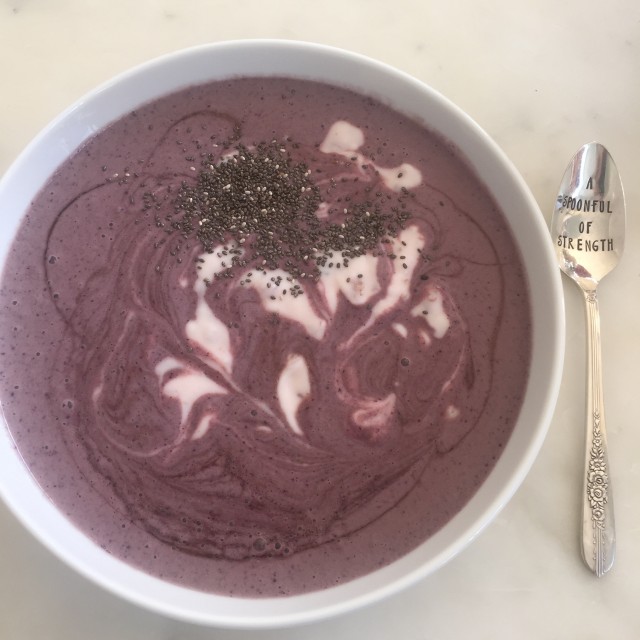
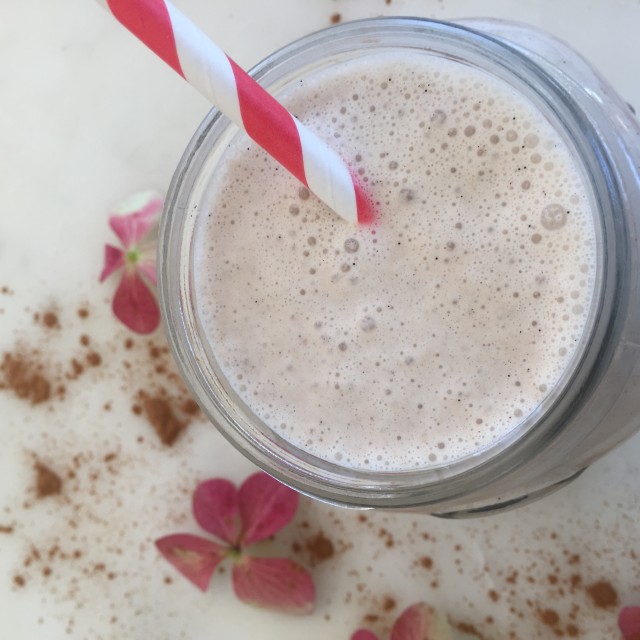
Choc Honey Frappe

choc-honey-frappe

By Rachel Grunwell

I love businesses that have values, make conscious decisions (about the environment and the people they work with) and boast a true heart-driven mission.

That’s why I love The True Honey Co – and, also, of course, because their ethically harvested Manuka honey from NZ’s most pristine locations is truly delicious.

Here’s a Choc Honey Frappe recipe that’s bursting with health benefits and takes only a minute to make. I try to have a teaspoon of Manuka honey in my daily ritual and its delicious all on its own. It’s yummy too in this recipe. Let me know what you think if you whip it up. It’s the perfect Summer afternoon go-to. My kids and I usually fight over the last drops!


Choc Honey Frappe

Ingredients:

1 teaspoon The True Honey Co. Honey (revered for its antibacterial properties)

1 frozen banana

Pinch vanilla bean powder

1/2 cup almond milk

1 cup ice

1 teaspoon flax-seed oil (full of omega-3 fatty acids) 

Pinch salt


Method:

Put all the ingredients into a blender and blitz until smooth. Then pour the thick mixture into a glass jar or cup and this is delicious all on its own. I dig mine out with a spoon. I topped this frappe with a wedge of organic dark chocolate and some fresh strawberries because I had them at hand.


To Find out more about True Honey Co. Manuka Honey click HERE.

Post by Rachel Grunwell: Good magazine recipe creator & wellness writer. Yoga teacher. Marathoner. Professional Blogger. Follow Rachel on Inspired Health’s Facebook & Instagram

rg-headshot

Sponsored content courtesy of the sweet peeps at True Honey Co. Manuka honey.

Cigna Wellington Round the Bays – enter the family!

img_5281

By Rachel Grunwell

Registrations are now open for a favourite annual Wellington event – Cigna Round the Bays.

But don’t just enter yourself for race day on February 19.

Step it up by entering with friends, work colleagues and family.

Together you can support each other’s training and get fitter and healthier.

Having a specific and achievable health goal on a set date like this event can help with keeping you all motivated on your health journey.

There’s a distance for every age and level: the Mitre 10 Mega buggy walk, the 6.5km fun run or walk, Bluebridge 10km, and the Cigna/Achilles half marathon (21km).

I’m stepping it up by getting my family involved, including husband Damien, and our kids Zach, 11, Lachie, 9, and Finn, 5.

Zach is especially excited about tackling his first 10km distance alongside me.

Actually, his speedy, young legs may leave me in his dust! The rest of my whanau will do the fun run.
Damien will likely be piggy-

backing little Finn near the end. The focus for our family,

training-wise, is to keep fitness fun and at the kids’ pace.

I’ll sneak in building a base fitness with my younger kids by doing things like scooter or bike rides, family walks, light jog at the weekend and walking to school sometimes.

Zach and I are doing run training, which we will build up slowly.

Meanwhile, tell your kids they are helping you to train for the event too.

Give your kids the title of chief coach. Remember to foster a can- do mind-set, with fitness and health in general around kids and be a positive role-model on this journey.

Inspiring your kids to be fit, healthy and happy is the ultimate gift, I reckon.
Lastly, visualise the red-faced, smiling, excited faces of your loved-ones at the finish-line and a shared feeling of success.

❚ Enter by registering HERE

❚ Column published in newspapers throughout Wellington.

Column by Rachel Grunwell, Cigna Health and Wellbeing Ambassador – a runner, qualified yoga teacher and director of the InspiredHealth website. Follow more of her personal journey to get her family ready for the event on Facebook and Instagram.

Rach 02

Spooky Gluten-Free Gingerbread

img_2339

Want more lifestyle inspiration – follow our Facebook Page Instagram Page 


By Rachel Grunwell


Halloween is a fun time for my family. The kids love to dress up all scary or witchy and go trick-or-treating around our neighbourhood on October 31. We’re in the Auckland suburb of Mt Eden where families are used to little ghostly and ghastly costume-wearing kids turning up at the door!

Instead of lollies, these gluten-free gingerbread men are a yummy treat to give the kids – or to give other little trick-or-treaters. Or just to make up anytime for fun!

My youngest witchy – son Finn, aged 5 (pictured) – gives these the thumbs up. He loves helping in the kitchen – and of course, taste-testing the bats, pumpkins and legless gingerbread men.

img_2362

Your kids will love making these too and so give them a whirl! Or if you have a cool and creepy recipe then share it with me too!!


Spooky Gluten-Free Gingerbread

Ingredients:

3 tablespoons Chelsea Golden Syrup

½ cup Chelsea Organic Coconut Sugar

1 teaspoon each of mixed spice and cinnamon

1.5 teaspoons ground ginger

1 tablespoon water

50g butter

1/2 teaspoon baking soda

1 ½ cups rice flour

½ cup potato flour

1 teaspoon baking powder

(add 2 teaspoons xanthum gum if you have it in the cupboard as this helps with binding the ingredients, but it’s not absolutely necessary)


Instructions

Place Chelsea Golden Syrup in a pan, along with Chelsea Organic Coconut Sugar, mixed spice, cinnamon, ground ginger and water.

Heat until the sugar dissolves and then switch off the heat place the butter in the pan to melt.

Let the mixture cool a little and then add the baking soda.

In another bowl, put the sifted gluten-free flour and baking powder. Then add the heated ingredients from the pan and mix until a workable dough. Add more rice flour if you need it (i.e. if the dough is too sticky). Then sprinkle a generous amount of rice flour on your bench and use a roller to roll out the dough. Press Halloween-style cookie-cutter shapes in this. Use a spatula to lift the shapes up from the bench and onto the trays (so they stay in one piece).

Bake these on a greased tray, 180-degrees for about 10 mins.


Note: Use a spatula to lift the shapes from the tray onto a cooling rack and then pop them into a container.


Icing:

150g dark chocolate

110g of coconut cream


Melt the chocolate in a double boiler (keep stirring throughout). Add the cream and mix. Leave this to cool to room temperature. Then pop it into an icing bag and pipe onto the biscuits. I used edible glitter too for an extra cool effect.

img_1744

Find more delicious recipes for these school holidays at chelsea.co.nz


This post was made possible thanks to Chelsea.


#NZBlogger #chelseasugar


Rachel is a recipe creator and wellbeing columnist for two magazines. She’s a yoga teacher, marathoner and director of the InspiredHealthNZ website, which inspires Kiwis to live a life they love. Follow Rachel on Facebook and Instagram.

Rach 02

Kids Yoga “Taking Off” at True Food & Yoga

img_0379

By Rachel Grunwell

The magical power of yoga can have transformative mind, body and soul benefits for us grown-ups. This ancient practice can also uplift our little “muggles” in equal measures.

Auckland’s True Food & Yoga wellness centre has just launched yoga classes for children and so I checked out a class with my son Lachie.

Firstly, this is one of the most beautiful studios in this city. That sea-side view from Tamaki Drive, overlooking the bobbing boats and sparkling waters of Okahu Bay – and that gorgeous glimpse of the Sky Tower in the distance – is soul-lifting in itself (even in overcast weather). Inside the former Hammerheads restaurant too is stunning. Those memorable arch-windows have that wow-factor and it’s a clean and fresh decor.

img_0422

But it’s the power of yoga on offer here for kids that’s out-of-this-world. Literally.

Yoga teacher Nisha Kumar-Joon invited her students to use their imagination and go on a “mystical adventure” and pretend to be in their very own spaceship in the room. So the kids gleefully zoomed about, fizzing and smiling. She inspired them to create their own stories with movement, while chilled music provided a backdrop. Other parts of the class too were equally creative. There were stretches, strength and then balance poses (imagine flying aeroplane poses here) and all of this required “focus”, which is good for brain development. While another part of the class saw the kids laying down, peaceful, eyes closed, meditative, and with a ball on their belly while they breathed (ie so the ball rose up and down on the belly so they could focus on how to correctly breathe with their diaphragm. This can powerfully calm down the nervous system).


img_0413 img_0451 img_0457

Mid-class the kids were colouring in and drawing anything space-like including stars, moons and other-worlds.


img_0502

Their parents were in another “world” too, some blissfully near the edges of the room reading lounging about on bean-bags. While others enjoyed welcome “me-time” out in the bistro on the other side of the centre.


img_0503 img_0520 img_0590 img_0646

So how was the experience for my son Lachie? Well, he walked into the class, a bit apprehensive, and knowing no one. But he tried all the yoga poses, drew a star, became a “space-ship” and loved running around the room. He giggled most over the games and loved a partner exercise with a little girl Sovinna, where they passed a ball using their feet. They both giggled, and giggled…

The kids were asked to “find their way home again” in their “spaceship” i.e. come back to their yoga mat for the closing of class. They then placed their mats in a collective star-shape. To see all their tiny hands in prayer-position to end the class was joyful.


img_0666 img_0667

Nisha, a hatha yoga teacher with an osteopathy background, says kids get so much out of yoga. There’s the cognitive development, physical benefits, and the emotional and spiritual sides of this practice too.

“It takes them away from their laptops and it gets them using their imaginations,” she raves.

It’s a wish for Nisha too that her little students learn “balance” in life and lots of wonderful de-stress tools as well as stretching their bodies – and imaginations.

Nic and Kelly Watt are creating a footprint in Auckland with their food and yoga offerings – and it’s wonderful to see kids are a part of their heart-filled focus.

Check out the timetable for Children’s Yoga classes at True Food & Yoga for either 3-5-year-olds and also 6-11-year-olds here:

img_0693


  • Rachel Grunwell is a mum, yoga teacher, marathoner, and magazine wellness columnist and writer. She regularly writes for many of NZ’s top media titles. She runs the InspiredHealth website (a lifestyle hub to inspire Kiwis to live well).
  • Follow InspiredHealth on Facebook &  Instagram

Rach 02

Buckwheat, Blueberry & Probiotic Smoothie Bowl

Buckwheat, Blueberry and Probiotic Smoothie Bowl


Buckwheat, Blueberry & Probiotic Smoothie Bowl

By Rachel Grunwell

I eat this for breakfast as an alternative to porridge. But you can have it for a mid-afternoon snack too. I like to dig mine out with a spoon from a smoothie bowl but you can put it in a cup instead. It’s great for digestive health.

Ingredients:

½ Cup of buckwheat (soaked in 1 Cup of water overnight to soften)

½ Cup water

½ Cup of blueberries (frozen or fresh is fine)

½ teaspoon of cinnamon

2 dates (pips removed)

Drizzle of rice malt syrup (or maple syrup is fine)

1 teaspoon of chia

A tub of probiotic yoghurt (I use Symbio pro-balance blueberry & wholegrains flavour, which compliments this recipe amazingly. This won Champion Yoghurt at the NZ Cheese Awards recently for good reason. It tastes delicious and the blueberry flavour bursts in your mouth, it has gluten-free grains, fibre, calcium, vitamins A & D and can help with your digestive health.

Method: Soak ½ Cup of Buckwheat in 1 Cup of water for several hours to soften (I do this overnight). Then remove the water. Put the buckwheat in a blender with the fresh water, cinnamon, blueberries and dates and blend. Pour this into a smoothie bowl and then top with the pro-biotic yoghurt, a drizzle of rice malt syrup and chia. Enjoy! 

Rachel is a wellbeing columnst and recipe creator for two magazines as well as inspiredhealth.co.nz/. Follow Inspired Health on Facebook  & Instagram 

Rach 02

Cashew, Cinnamon & Cardamom Milk

cashew milk

Cashew, Cinnamon & Cardamom Milk

This is so good that after I photographed it I polished off the lot! Yeah, that good. It went in one slurp! Actually, it’s even better after it has been in the fridge for a bit. Although, I obviously don’t have the will-power to leave it for that long without scoffing the lot!

Here’s what to do:

Place 1 cup of raw cashews in a bowl and cover with filtered water. Leave this to soak overnight. Next, rinse the soaked and softened cashews and put them in your NutriBullet with 3 fresh Cups of filtered water. Ps the NutriBullet is such a favourite toy of mine. I use it for making smoothies, bliss balls and a whole heap of other things. It’s powerful and so easy to use and clean. It usually gets used a couple of times daily.

Anyway, once you’ve blitzed the cashews in water then get a nut milk bag out and hold it open inside a bowl and pour the nut milk and pulp into the bag. Put the pulp to the side and use the smooth milk for this recipe. (You can use the pulp for other recipes and so pop it into the fridge).

Next scrape out 1 vanilla bean pod into the nut milk, place two dates (take out pips) in there too, 1/2 teaspoon each of cinnamon and cardamom, a handful of ice and blend. You can keep it creamy and thick as it is or add more filtered water and blitz. Now slurp it up in one go! Or put it in the fridge and have it deliciously cool if you have will-power.

  • Rachel is a healthy food recipe creator and wellbeing columnist for two magazines. She is a mum, marathoner, yoga teacher the director of the Inspired Health website.
  • Follow Inspired Health on:   Facebook    Instagram   Twitter

Rach 02


Matcha Green Tea & Super Green Smoothie Bowl

green macha smoothie

Matcha Green Tea & Super Green Smoothie Bowl

By Rachel Grunwell

This is great for injecting some green goodness into your life. You can have it as a smoothie bowl snack, or even have it for breakfast. Make it the night before and you can drink it on the go!

Whatever way you have it, it will help you go, go, go. It’s an antioxidants hit and it will help revitalise the body and mind.

Here’s what’s in it:

Put the following into a NutriBullet: 1 Cup of Kale, 1 big leaf of Spinach, 2 Feijoas (skin removed), 1 Cup of canned Pears, 1 Cup of VitaCoco coconut Water, a Handful of Ice, ½ a Teaspoon of Blackmores Matcha Gree Tea powder, 1 Teaspoon of Blackmores of Vitality Super Greens powder and 2 sprigs of Parsley. Blend and pour in a smoothie bowl and enjoy. I topped mine with coconut chips, chia and edible flowers, but that’s just optional if you want to pretty it up 😉

  • Rachel is a healthy food recipe creator and wellbeing columnist for two magazines. She is a mum, marathoner, yoga teacher and also the director of the Inspired Health website.
  • Follow Inspired Health on:   Facebook    Instagram   Twitter

Rach 02

Here is another smoothie creation by Rachel:

Best Banana & Chocolate Smoothie Sensation


Best Banana & Chocolate Smoothie Sensation

banana & choc smoothie

Best Banana & Chocolate Smoothie Sensation

Words & recipe: By Rachel Grunwell

Get a spoon at the ready. You’ll need it to dig this beauty out of the jar. This is a delicious smoothie treat. But really, it’s a heavenly decadent dessert too. You choose.

The sweetness comes from fruit. So there’s no added nasties. However, you might want to share it with someone. Otherwise, you’ll likely eat the whole thing on your own – like I did!

It’s full of great ingredients that are good to taste but are also good skin food too – like almond milk and avocado. So really you should make this to make your skin glow. As if you need another reason, through, right 😉

Here’s the recipe:

Put the following in a jar – about a cup of Pure Delish no-grain-ola. Then to prepare the banana and nut layer: Put the following in your NutriBullet: 2 frozen bananas, 1 teaspoon of honey, 1 tablespoon of Pic’s cashew butter, ½ cup of almond milk, ½ teaspoon of almond oil. Blitz it all up within about 10 seconds. Then pour this into the jar. For the top layer put the following in your NutriBullet: 1 frozen banana, 3 ice-cubes, ½ avocado, 1 tablespoon of cacao and blitz this. Then pour the chocolate later on top. Enjoy it as it is. Or if you want you can top it with cacao nibs and a couple of lavender flowers to show off 😉

Rachel is a healthy food recipe creator for two magazines. She is a mum, marathoner, yoga teacher and wellbeing columnist for two NZ magazines too. She is the director of the Inspired Health website.

Follow Inspired Health on:   Facebook    Instagram   Twitter

Rach 02


Raspberry Heaven Smoothie Bowl – packed full of antioxidants!

Raspberry Dream Smoothie Bowl

Raspberry Heaven Smoothie Bowl – Delicious!

By Rachel Grunwell

We tend to reach for oranges when we are after a Vitamin C boost. But if you want to change things up then reach for raspberries and beetroot powder for your smoothie!

Raspberries make for the prettiest smoothie colour, but they are packed with Vitamin C and antioxidants which help us fight off ageing. Antioxidants help reduce inflammation – one of the many factors that can age us. While beetroot powder has antioxidants, fibre, vitamins and minerals and helps detoxify and supports stamina and endurance performance (so great for my love of running!) 

This recipe has some great nutrients, but it’s also packed full of flavour. My smoothies have to taste good too. It’s a sweet-hit and it had my kids smiling and asking for more.

Here’s the recipe:

Raspberry Heaven Smoothie Bowl

Put 1 Cup each of Frozen Raspberries and VitaCocoNZ coconut water, 1 frozen banana, 1 Teaspoon of GoSuperFood Beetroot Powder, 1 Scoop of Lifestream Essential Protein Natural Chai powder into your trusty NutriBullet and blend. You can drink this in a cup or put it into a smoothie bowl and dig it out with a spoon. Or if you want to be all fancy-pants and show off then you can put some toppings on top. I topped mine with dried rose petals and Pure Delish Raspberry & Maple Nut No-Grain-Ola. Enjoy!

Rachel is a wellbeing columnist and healthy recipe creator for two magazines. She’s a mum, marathoner, yoga teacher and the director of the Inspired Health website.

Follow Inspired Health on:   Facebook      Instagram      Twitter

Rach 02


Carrot Cake with Cashew Cream Icing

carrot cake + Chelsea Raw Sugar

Here’s my Carrot Cake with Cashew Cream Icing !

Remember to like & follow our Facebook page:
By Rachel Grunwell

Here’s a recipe for Carrot Cake with Cashew Cream Icing that I created, which tastes really good.

Ingredients:
1.5 Cups of Brown Rice Flour
½ Cup of Coconut Flour
½ Cup of Potato Flour
2 Tablespoons of Ground Chia 
2 Teaspoons of Baking Soda
3 Teaspoons of Ground Cinnamon
Pinch of salt
4 Eggs
1 Cup of Raw Sugar
½ Cup of Olive Oil
1 Teaspoon of Vanilla
5 Grated Carrots (peeled and grated)
½ Cup of Raw Walnuts (chopped)
1 Cup “Sour Milk” (mix 1 tablespoon of lemon juice to 1 cup of milk)

Instructions:
Turn oven to 180-degrees. Put baking paper in a baking tin and spray this with cooking oil. Sift the flours, ground chia, baking soda, cinnamon and salt in a bowl. In another bowl, whisk the eggs, sugar, olive oil, vanilla, carrots and sour milk. Next, combine both bowls of ingredients together and then add the walnuts. Place the mixture in the baking tin and bake for 45-minutes at 180-degrees (or a bit longer if you use a deep baking tin).
Cool on a wire rack and then ice. I used cashew cream icing.
To make the Cashew Cream Icing I just put 1 Cup of raw cashews in a bowl of filtered water for about four hours to soften. I then rinsed them and put the cashews in a blender with just a little fresh filtered water and blitzed them until smooth. I put the cashew “cream” in the fridge to thicken up and then put it into a piping bag (with a swirl tube on the end) and piped this onto the cake (but you could just spread it with a knife more quickly if you wish). I topped with edible flowers and served this up to the chief taste-testers – my kids. Oh and the bloke loved this cake too.

Give this recipe a go!!! It’s delicious and has just the right amount of sweetness. If you make it then please let me know what you think! Eve better send me a pic of your masterpiece so I can go ooooh and ahhhh and we can talk carrot cake!